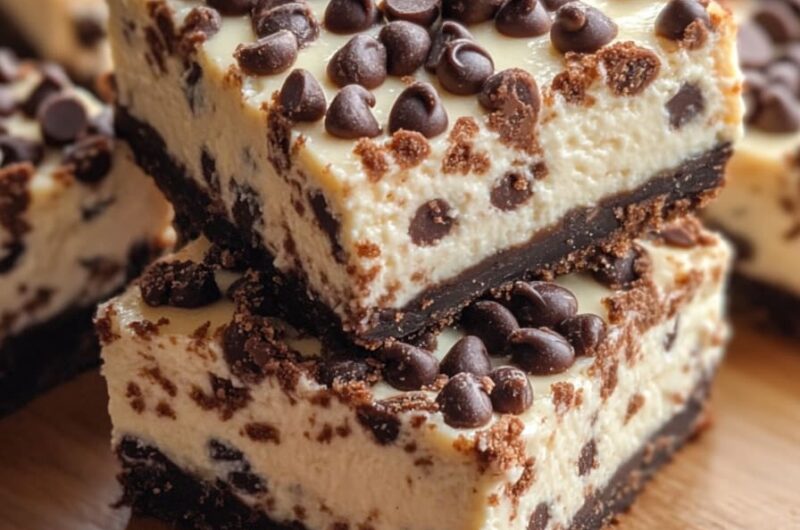
Chocolate Chip Cheesecake Bars are an amazing treat that combines the rich flavors of cheesecake with the delightful crunch of chocolate chips. These comforting bars provide a decadent dessert experience reminiscent of a classic cheesecake but are easier to make and serve. If you’ve ever craved the creaminess of cheesecake and the sweetness of chocolate in one bite, this recipe is for you!
Imagine cutting into a perfectly baked layer of creamy cheesecake infused with melty chocolate chips. The joys of serving this dessert are endless, making it a favorite for family gatherings, parties, or just a cozy night in. In this article, we’ll explore why Chocolate Chip Cheesecake Bars are beloved, how to prepare them, and the best ways to serve them.
You might wonder why you should try making these cheesecake bars at home. Besides the delightful taste, the process is simple enough for even beginner bakers. So, let’s dive into everything you need to know about these incredible bars!
Why You’ll Love This Recipe
The allure of Chocolate Chip Cheesecake Bars lies in their versatile nature and ease of preparation. Here are several reasons why you will fall head over heels for this recipe:
1. Easy Preparation – With straightforward steps and minimal cooking skills required, anyone can make these delectable bars.
2. Decadent Flavor – The combination of creamy cheesecake and chocolate chips creates a flavor explosion that will satisfy your sweet tooth.
3. Perfect for Any Occasion – Be it a birthday, holiday celebration, or just a weeknight dessert, these bars fit the bill perfectly.
4. Simple Ingredients – Most of the ingredients are pantry staples, making it convenient to whip these up anytime.
5. Make Ahead – These bars can be prepared in advance and stored, making them perfect for busy bakers.
6. Impressive Appearance – Cut into squares, they look beautiful and are sure to wow your guests.
Therefore, whether you’re preparing for a special occasion or just in need of a delicious treat, these Chocolate Chip Cheesecake Bars will exceed your expectations!
Preparation and Cooking Time
Creating these delightful cheesecake bars is quicker than you might think! Below is the approximate timeline:
– Preparation Time: 20 minutes
– Cooking Time: 30-35 minutes
– Cooling Time: 1-2 hours (for best results)
Overall, you can expect to spend about 2 hours on this recipe from start to finish, including cooling time. This is a great way to whip up a batch for guests or family gatherings without overwhelming your schedule.
Ingredients
– 2 cups graham cracker crumbs
– ½ cup granulated sugar
– ½ cup unsalted butter, melted
– 2 (8-ounce) packages cream cheese, softened
– 1 cup granulated sugar
– 2 large eggs
– 1 teaspoon vanilla extract
– 1 teaspoon lemon juice
– 1 cup semi-sweet chocolate chips
– Pinch of salt
Step-by-Step Instructions
Follow these straightforward steps to create your Chocolate Chip Cheesecake Bars:
1. Preheat your oven: Set it to 325°F (160°C). Grease a 9×13-inch baking pan or line it with parchment paper for easy removal.
2. Make the crust: In a mixing bowl, combine graham cracker crumbs, ½ cup sugar, and melted butter. Mix until the crumbs are moist and well blended. Press the mixture into the bottom of the prepared pan evenly.
3. Prepare the cheesecake filling: In a large bowl, beat the softened cream cheese and 1 cup sugar with an electric mixer until smooth and creamy. This should take about 2-3 minutes.
4. Add eggs and flavors: Add eggs one at a time, mixing well after each addition. Then, incorporate the vanilla extract and lemon juice. Mix until fully combined.
5. Fold in chocolate chips: Gently stir in the semi-sweet chocolate chips until evenly distributed.
6. Pour the filling over the crust: Spread the cheesecake mixture over the graham cracker crust, smoothing it out with a spatula.
7. Bake: Place the pan in the preheated oven and bake for 30-35 minutes. The cheesecake should be set but may have a slight jiggle in the center.
8. Cool: Once done, remove from the oven and let it cool at room temperature for about an hour. After that, refrigerate for at least one hour (or until firm) before slicing.
9. Slice and serve: Carefully cut the bars into squares and serve chilled.
With these simple instructions, you’ll be able to create beautiful Cheesecake Bars that everyone will enjoy!
How to Serve
Serving Chocolate Chip Cheesecake Bars can be just as fun as making them. Here are some creative ideas for presenting your dessert:
1. Plate Presentation: Use a decorative platter or cake stand to serve the bars. A simple dusting of powdered sugar on top can make them look elegant.
2. Accompaniments: Consider offering whipped cream, fresh berries, or a drizzle of chocolate sauce on the side for added indulgence.
3. Coffee Pairing: These bars pair wonderfully with a cup of coffee or tea. Offer drinks to enhance the experience further.
4. Storing Leftovers: Should there be any leftovers, store them in an airtight container in the refrigerator for up to five days.
5. Warm Up: For a fun twist, microwave a bar for a few seconds before serving. The chocolate chips will melt slightly, making it extra delicious!
By following these serving suggestions, you can create a memorable dessert experience that elevates your Chocolate Chip Cheesecake Bars from delicious to extraordinary!
Additional Tips
– Experiment with Toppings: Try adding a layer of caramel or butterscotch sauce on top for an extra flavor boost.
– Use Room Temperature Ingredients: Ensure cream cheese is softened properly for a smooth filling. This helps the ingredients combine better.
– Chill Longer for Better Texture: For an even creamier texture, consider chilling the bars overnight. This allows the flavors to meld beautifully.
Recipe Variation
Feel free to customize your Chocolate Chip Cheesecake Bars with these variations:
1. Cookie Dough Layer: Incorporate a layer of edible cookie dough on top of the cheesecake filling for an added treat.
2. Nutty Delight: Add chopped nuts like pecans or walnuts to the cheesecake mixture for a crunchy texture.
3. Flavored Cheesecake: Mix in a tablespoon of your favorite liqueur, like Baileys or Amaretto, for a unique twist on flavor.
Freezing and Storage
– Storage: Keep your cheesecake bars in an airtight container in the refrigerator. They will stay fresh for about 5 days.
– Freezing: You can freeze these bars for later enjoyment. Wrap each portion tightly in plastic wrap, then place them in a freezer-safe container. They can last for up to 3 months.
Special Equipment
To make your Chocolate Chip Cheesecake Bars, you will need the following tools:
– Mixing Bowls: Various sizes for mixing crust and filling.
– Electric Mixer: For achieving a smooth cheesecake filling.
– Spatula: Useful for spreading the cheesecake mixture evenly.
– 9×13-inch Baking Pan: The perfect size for creating the bars.
– Knife or Pizza Cutter: For precisely cutting the bars into uniform squares.
Frequently Asked Questions
Can I use a different type of chocolate?
Yes! Dark chocolate or milk chocolate chips can be substituted based on your preference.
How do I know when the cheesecake bars are done?
They are done when the edge is set, and the center still has a slight jiggle. It will firm up as it cools.
What if I don’t have graham cracker crumbs?
You can use crushed digestive biscuits or vanilla wafer cookies as an alternative for the crust.
Can I make these cheesecake bars gluten-free?
Absolutely! Use gluten-free graham crackers or another gluten-free baking option for the crust.
What can I serve with these cheesecake bars?
Fresh fruit, whipped cream, or a scoop of ice cream are fantastic accompaniments!
Conclusion
Chocolate Chip Cheesecake Bars are the ultimate delight for anyone who loves dessert. Their creamy texture and decadent chocolate mix make them irresistible, whether for a special occasion or just a sweet indulgence at home. With easy preparation and multiple variations, you can make these bars unique every time. So gather your ingredients and prepare to impress your family and friends with this delightful treat!
Chocolate Chip Cheesecake Bars: An Incredible Ultimate Recipe
- Prep Time: 15 minutes
- Cook Time: 30-35 minutes
- Total Time: 46 minute
Ingredients
– 2 cups graham cracker crumbs
– ½ cup granulated sugar
– ½ cup unsalted butter, melted
– 2 (8-ounce) packages cream cheese, softened
– 1 cup granulated sugar
– 2 large eggs
– 1 teaspoon vanilla extract
– 1 teaspoon lemon juice
– 1 cup semi-sweet chocolate chips
– Pinch of salt
Instructions
Follow these straightforward steps to create your Chocolate Chip Cheesecake Bars:
1. Preheat your oven: Set it to 325°F (160°C). Grease a 9×13-inch baking pan or line it with parchment paper for easy removal.
2. Make the crust: In a mixing bowl, combine graham cracker crumbs, ½ cup sugar, and melted butter. Mix until the crumbs are moist and well blended. Press the mixture into the bottom of the prepared pan evenly.
3. Prepare the cheesecake filling: In a large bowl, beat the softened cream cheese and 1 cup sugar with an electric mixer until smooth and creamy. This should take about 2-3 minutes.
4. Add eggs and flavors: Add eggs one at a time, mixing well after each addition. Then, incorporate the vanilla extract and lemon juice. Mix until fully combined.
5. Fold in chocolate chips: Gently stir in the semi-sweet chocolate chips until evenly distributed.
6. Pour the filling over the crust: Spread the cheesecake mixture over the graham cracker crust, smoothing it out with a spatula.
7. Bake: Place the pan in the preheated oven and bake for 30-35 minutes. The cheesecake should be set but may have a slight jiggle in the center.
8. Cool: Once done, remove from the oven and let it cool at room temperature for about an hour. After that, refrigerate for at least one hour (or until firm) before slicing.
9. Slice and serve: Carefully cut the bars into squares and serve chilled.
With these simple instructions, you’ll be able to create beautiful Cheesecake Bars that everyone will enjoy!
Nutrition
- Serving Size: 16 squares
- Calories: 320 kcal
- Fat: 18g
- Protein: 5g