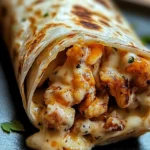
Cheesy Garlic Chicken Wraps are a delicious way to bring flavor and excitement to your kitchen. This incredible recipe combines tender chicken, gooey cheese, and the aromatic goodness of garlic, all wrapped in a soft tortilla. Whether enjoyed as a quick lunch or a fabulous dinner, these wraps are bound to impress your family and friends. Imagine sinking your teeth into a warm, cheesy bite filled with seasoned chicken and flavorful garlic. It’s a wrap that truly makes for a wonderful meal experience!
If you have ever craved a dish that is both satisfying and easy to prepare, Cheesy Garlic Chicken Wraps may just be your new favorite. The first bite reveals a tantalizing blend of flavors that are sure to keep you coming back for more. This recipe is not only delicious but also versatile, allowing you to customize each wrap to your liking. In this guide, we will cover why this recipe stands out, how to prepare it effortlessly, and tips for serving it right. Whether you’re a seasoned cook or a beginner in the kitchen, the amazing flavors of Cheesy Garlic Chicken Wraps will not disappoint!
From the rich taste of melted cheese to the aromatic allure of garlic, each ingredient plays its part in creating a wrap that is nothing short of spectacular. You’ll find this dish is perfect for various occasions, whether you’re hosting a casual dinner, preparing a picnic, or simply wanting a comforting meal at home. Let’s dive into what makes Cheesy Garlic Chicken Wraps a must-try recipe for everyone!
Why You’ll Love This Recipe
Cheesy Garlic Chicken Wraps come together in a delightful fusion of flavors and textures. Several factors make this recipe irresistible, including:
1. Quick and Easy – It takes only about 30 minutes from start to finish.
2. Customizable – Easily adapt the recipe to include your favorite veggies or sauces.
3. Family Friendly – Kids and adults alike will love these flavorful wraps.
4. Affordable Ingredients – Most ingredients can be found in your pantry or local grocery store.
5. Perfect for Meal Prep – Prepare and store these wraps for quick meals throughout the week.
6. Amazing Flavor Profile – The combination of cheesy, garlicky, and savory elements is hard to beat!
With these benefits in mind, it’s clear why Cheesy Garlic Chicken Wraps become a household favorite in no time. Each bite delivers joy, comfort, and a delightful taste sensation!
Preparation and Cooking Time
In total, preparing Cheesy Garlic Chicken Wraps will take about 30 minutes. Here is a breakdown of the time needed:
– Preparation Time: 10 minutes
– Cooking Time: 20 minutes
These times may vary slightly based on your kitchen skills and tools, but this guide gives a solid estimate.
Ingredients
– 1 pound boneless, skinless chicken breasts
– 1 tablespoon olive oil
– 4 cloves garlic, minced
– 1 teaspoon paprika
– ½ teaspoon salt
– ½ teaspoon black pepper
– 1 cup shredded mozzarella cheese (or cheese of choice)
– 4 large flour tortillas
– ½ cup sour cream (optional)
– Fresh parsley or cilantro, for garnish
Step-by-Step Instructions
Creating Cheesy Garlic Chicken Wraps is straightforward when following these easy-to-follow steps:
1. Cook the Chicken: In a skillet, heat the olive oil over medium heat. Add the chicken breasts and cook for about 6-7 minutes on each side, or until cooked through. The internal temperature should reach 165°F (75°C).
2. Add Garlic and Seasoning: Once the chicken is cooked, add the minced garlic, paprika, salt, and black pepper to the skillet. Sauté for an additional 2-3 minutes until the garlic turns golden and fragrant.
3. Shred the Chicken: Remove the chicken from the skillet and let it rest for a moment. Then, shred it using two forks.
4. Add Cheese: Return the shredded chicken to the skillet, and sprinkle the shredded mozzarella cheese on top. Stir until the cheese begins to melt.
5. Prepare the Tortillas: While the cheese melts, warm the tortillas in a separate skillet or microwave for about 30 seconds, just until pliable.
6. Assemble the Wraps: Place a generous portion of the cheesy chicken mixture on each tortilla. If desired, add sour cream for extra creaminess.
7. Roll the Wraps: Fold the sides of the tortillas inward and roll them up tightly, ensuring the filling stays inside.
8. Toast (Optional): For an extra layer of flavor, toast the wraps in the skillet on medium heat for 1-2 minutes on each side until golden brown.
These steps will help you create amazing Cheesy Garlic Chicken Wraps that everyone will love!
How to Serve
To make the most of your Cheesy Garlic Chicken Wraps, consider the following serving suggestions:
1. Presentation: Slice the wraps diagonally for a visually appealing display. Arrange them on a serving platter for guests.
2. Accompaniments: Serve with a side of tortilla chips and salsa or fresh guacamole for a complete snack experience.
3. Dipping Sauces: Offer options like ranch, salsa, or chipotle mayo for dipping to enhance the flavor.
4. Garnish: Top with freshly chopped parsley or cilantro for a pop of color and added flavor.
With these serving ideas, you can create a memorable dining experience featuring your delicious Cheesy Garlic Chicken Wraps for friends or family!
Additional Tips
– Experiment with Seasonings: Don’t hesitate to add your favorite spices to the chicken mixture. Chili powder, cumin, or even a pinch of cayenne can add a delightful kick.
– Tortilla Types: You can use whole wheat or corn tortillas if you prefer a different flavor or a healthier option.
– Make it Mess-Free: Use parchment paper to line your serving platter for easy cleanup, especially if you’re gathering around for a casual meal.
Recipe Variation
Explore these exciting twists on the classic Cheesy Garlic Chicken Wraps:
1. Buffalo Style: Toss the cooked chicken with buffalo sauce before assembling the wraps for a spicy kick.
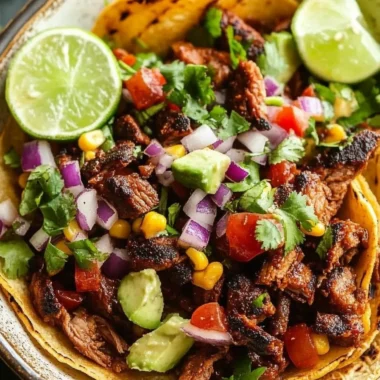
2. Veggie Lovers: Include sautéed bell peppers, spinach, or mushrooms in the chicken mixture for added nutrition.
3. Hawaiian Twist: Add pineapple chunks to the mixture for a unique sweetness that pairs well with the savory elements.
Freezing and Storage
– Storage: Store any leftover wraps in an airtight container in the refrigerator. They should remain fresh for up to 3 days.
– Freezing: Wrap each assembled wrap in aluminum foil and place them in a freezer-safe bag. They can be frozen for up to 2 months. To reheat, thaw overnight in the fridge and then warm in the oven or microwave.
Special Equipment
Having the right kitchen tools can simplify the preparation of Cheesy Garlic Chicken Wraps:
– Skillet: A non-stick skillet is ideal for cooking chicken and melting cheese.
– Shredder or Forks: Utilize a meat shredder or two forks to easily shred the chicken.
– Microwave or Tortilla Press: A microwave can warm tortillas quickly, while a tortilla press can help achieve uniform thickness (if you’re making homemade tortillas).
Frequently Asked Questions
Can I use chicken thighs instead of breasts?
Yes, chicken thighs can be used for a juicier and more flavorful option.
What if I don’t like garlic?
You can skip the garlic or replace it with other herbs and spices like thyme or basil for a different flavor profile.
Can I make these wraps vegetarian?
Absolutely! Substitute the chicken with sautéed mushrooms, beans, or a mix of your favorite vegetables.
How do I keep the cheese from leaking out?
Ensure the wraps are rolled tightly, and consider toasting them, which helps seal the edges.
Can I serve these wraps cold?
Yes, they can be enjoyed cold, especially if you add fresh veggies and dips for a refreshing twist.
Conclusion
Cheesy Garlic Chicken Wraps are a delightful meal option that offers great flavor and versatility. Their ease of preparation makes them a go-to dish for both busy weeknights and leisurely weekends. You can indulge your taste buds while customizing the ingredients to suit your preferences. Whether enjoyed as a quick snack or a full meal, these wraps promise to leave a lasting impression!
Cheesy Garlic Chicken Wraps: An Amazing Ultimate Recipe
- Prep Time: 15 minutes
- Cook Time: 20 minutes
- Total Time: 35 minutes
Ingredients
– 1 pound boneless, skinless chicken breasts
– 1 tablespoon olive oil
– 4 cloves garlic, minced
– 1 teaspoon paprika
– ½ teaspoon salt
– ½ teaspoon black pepper
– 1 cup shredded mozzarella cheese (or cheese of choice)
– 4 large flour tortillas
– ½ cup sour cream (optional)
– Fresh parsley or cilantro, for garnish
Instructions
Creating Cheesy Garlic Chicken Wraps is straightforward when following these easy-to-follow steps:
1. Cook the Chicken: In a skillet, heat the olive oil over medium heat. Add the chicken breasts and cook for about 6-7 minutes on each side, or until cooked through. The internal temperature should reach 165°F (75°C).
2. Add Garlic and Seasoning: Once the chicken is cooked, add the minced garlic, paprika, salt, and black pepper to the skillet. Sauté for an additional 2-3 minutes until the garlic turns golden and fragrant.
3. Shred the Chicken: Remove the chicken from the skillet and let it rest for a moment. Then, shred it using two forks.
4. Add Cheese: Return the shredded chicken to the skillet, and sprinkle the shredded mozzarella cheese on top. Stir until the cheese begins to melt.
5. Prepare the Tortillas: While the cheese melts, warm the tortillas in a separate skillet or microwave for about 30 seconds, just until pliable.
6. Assemble the Wraps: Place a generous portion of the cheesy chicken mixture on each tortilla. If desired, add sour cream for extra creaminess.
7. Roll the Wraps: Fold the sides of the tortillas inward and roll them up tightly, ensuring the filling stays inside.
8. Toast (Optional): For an extra layer of flavor, toast the wraps in the skillet on medium heat for 1-2 minutes on each side until golden brown.
These steps will help you create amazing Cheesy Garlic Chicken Wraps that everyone will love!
Nutrition
- Serving Size: 4 wraps
- Calories: 475 kcal
- Fat: 20g
- Protein: 35g