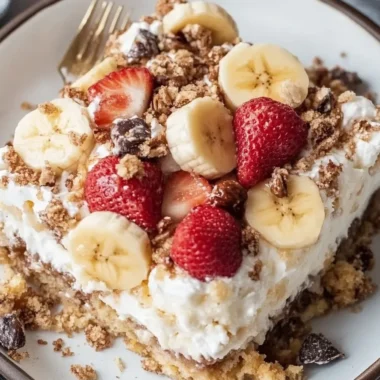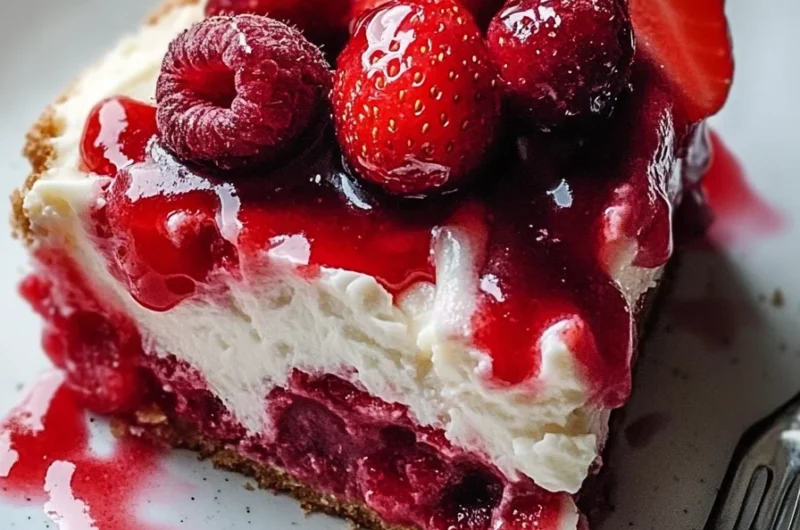
Gooey Strawberry Earthquake Cake is an amazing dessert that promises to impress anyone lucky enough to taste it. Combining rich flavors and textures, this cake offers a wonderful experience that awakens the taste buds. The term “earthquake” aptly describes the delightful cracks and crevices on the surface, filled with luscious cream cheese and juicy strawberry filling. This cake isn’t just another dessert; it’s a sensational treat that embodies the sweet pleasures of baking. Whether for birthdays, family gatherings, or just a cozy evening at home, this cake is a guaranteed crowd-pleaser.
If you’ve never encountered a cake that melds the sweet essence of strawberries with rich, gooey textures before, you’re in for a delightful surprise. The first bite reveals a complex interplay between fluffy cake, creamy cheese, and luscious strawberry bits, ensuring a scrumptious symphony of flavors. As you prepare this dish, you will not only enjoy the baking process but also anticipate the joy of sharing it with others. This incredible recipe for Gooey Strawberry Earthquake Cake will soon become a staple in your dessert repertoire.
Let’s dive in and explore what makes the Gooey Strawberry Earthquake Cake a standout option. From its delightful flavors to its stunning presentation, this cake will surely not only satisfy your sweet cravings but also leave a lasting impression on everyone who gets to taste it.
Why You’ll Love This Recipe
The Gooey Strawberry Earthquake Cake is packed with features that make it irresistible. Here are some reasons you will fall head over heels for this fantastic dessert:
1. Bursting with Flavor – The combination of strawberries and cream cheese creates a rich taste that will have your taste buds dancing.
2. Visually Stunning – The cracks filled with creamy goodness make it a showstopper on any dessert table.
3. Easy to Make – With simple steps and widely available ingredients, even novice bakers can feel like pros.
4. Versatile Option – This cake can be tailored to your flavor preferences by experimenting with different fruit fillings or cake bases.
5. Perfect for Any Occasion – Whether celebrating a special event or just indulging yourself, this cake fits any scenario.
6. Great for Sharing – With its generous servings, you can share a slice with friends or family, making it the perfect social treat.
Every aspect of this cake—taste, appearance, and effortless preparation—creates a memorable dessert experience, ensuring that it will be loved by everyone you serve it to.
Preparation and Cooking Time
Creating the Gooey Strawberry Earthquake Cake is a straightforward process that requires about 1 hour and 30 minutes in total. Below is a breakdown of the time commitment required:
– Preparation Time: 25 minutes
– Cooking Time: 40-45 minutes
– Cooling Time: 20 minutes
Depending on your experience level and kitchen tools, these times may vary slightly, but this outline provides an accurate estimate for your baking adventure!
Ingredients
– 1 box of chocolate cake mix
– 1 cup water
– 1/3 cup vegetable oil
– 3 large eggs
– 1 cup strawberries, hulled and diced
– 8 oz cream cheese, softened
– 1 cup powdered sugar
– 1 teaspoon vanilla extract
– 1/2 cup strawberry jam
– 1/2 cup mini chocolate chips (optional)
– Powdered sugar for dusting (optional)
Step-by-Step Instructions
Follow these steps to create the amazing Gooey Strawberry Earthquake Cake:
1. Preheat the Oven: Start by preheating your oven to 350°F (175°C). Grease a 9×13-inch baking dish to prepare for the cake.
2. Mix the Cake Batter: In a large mixing bowl, combine the chocolate cake mix, water, vegetable oil, and eggs. Mix according to package directions until well-blended.
3. Pour the Batter: Pour the cake batter into the prepared baking dish, spreading it evenly.
4. Prepare the Cream Cheese Layer: In a separate bowl, beat together the softened cream cheese, powdered sugar, and vanilla extract until smooth.
5. Add the Strawberries: Stir in the diced strawberries and half of the mini chocolate chips (if using) into the cream cheese mixture.
6. Spoon Cream Cheese Mixture: Drop spoonfuls of the cream cheese mixture randomly over the surface of the cake batter. Do not spread; let it sit to create the “earthquake” effect while baking.
7. Add Strawberry Jam: Drizzle the strawberry jam over the top of the cake, distributing it as evenly as possible.
8. Bake the Cake: Place the baking dish in the preheated oven and bake for 40-45 minutes, or until a toothpick inserted into the center comes out clean.
9. Cool the Cake: Once baked, remove the cake from the oven and let it cool in the pan for about 20 minutes.
10. Dust with Powdered Sugar: If desired, dust the top of the cooled cake with powdered sugar for an elegant touch.
11. Add Remaining Chocolate Chips: Sprinkle the remaining mini chocolate chips on top for extra flavor and decoration.
How to Serve
Creating the perfect serving experience for your Gooey Strawberry Earthquake Cake can enhance your dessert enjoyment. Consider the following tips when serving:
1. Presentation: A well-presented cake can elevate the dining experience. Employ a cake stand or a decorative platter for serving.
2. Pairings: Enhance the taste further by serving alongside whipped cream or vanilla ice cream. A scoop of ice cream complements the gooey textures perfectly.
3. Serving Sizes: Cut into generous yet manageable slices to encourage guests to go for seconds while maintaining satisfaction.
4. Beverages: Consider pairing the cake with a glass of sparkling water, milk, or even a light dessert wine to balance the sweetness.
5. Garnishing: Add fresh strawberry slices on top, or place a small sprig of mint for color and flavor contrast.
By paying attention to how you serve the Gooey Strawberry Earthquake Cake, you create a delightful experience that will make your dessert not only memorable but also deliciously inviting.
Additional Tips
– Use Fresh Ingredients: For the best flavor, use ripe strawberries and fresh cream cheese. Quality ingredients will enhance the overall taste.
– Don’t Overmix the Batter: When combining the cake ingredients, mix just until combined. Overmixing can lead to a denser texture.
– Let the Cake Cool Completely: Allow the cake to cool completely in the pan before slicing. This will help maintain its gooey texture.
Recipe Variation
Feel free to get creative with your Gooey Strawberry Earthquake Cake! Here are a few variations to consider:
1. Different Fruit Fillings: Swap out strawberries for blueberries, raspberries, or blackberries for a berry medley.
2. Nutty Addition: Incorporate chopped nuts like walnuts or pecans into the cream cheese mixture for added flavor and crunch.
3. Chocolate Cake Mix Alternative: For a unique twist, use a vanilla or red velvet cake mix instead of chocolate.
Freezing and Storage
– Storage: Store any leftover cake in an airtight container in the refrigerator. It should stay fresh for about 4-5 days.
– Freezing: You can freeze slices of the cake for up to 3 months. Wrap them tightly in plastic wrap and aluminum foil to prevent freezer burn.
Special Equipment
To bake the Gooey Strawberry Earthquake Cake, you’ll need the following kitchen tools:
– 9×13-inch Baking Dish: Ideal for the baking and cooling process.
– Mixing Bowls: For preparing the cake batter and cream cheese layer.
– Electric Mixer: Easiest way to achieve a smooth cream cheese mixture.
– Spatula: For spreading and spooning the cream cheese layer.
– Cooling Rack: Helps to cool the cake evenly post-baking.
Frequently Asked Questions
How do I know when the cake is done baking?
Insert a toothpick into the center; if it comes out clean or with a few moist crumbs, the cake is done.
Can I make this cake ahead of time?
Absolutely! It can be prepared a day in advance, allowing the flavors to meld beautifully.
Is this cake suitable for dietary restrictions?
You can modify the recipe by using gluten-free cake mix for a gluten-free option or using dairy-free cream cheese for lactose intolerance.
Can I use other flavors instead of chocolate?
Yes! Feel free to choose a cake mix that suits your taste, like vanilla or red velvet.
Conclusion
The Gooey Strawberry Earthquake Cake is more than just a dessert; it’s an experience. With its delightful taste that combines creamy, fruity, and chocolatey flavors, every bite is truly indulgent. Perfect for any occasion, this cake will surely impress your friends and family, leaving them eagerly asking for seconds. Make it the star of your dessert table!
Gooey Strawberry Earthquake Cake: An Incredible Ultimate Recipe You Need to Try

- Prep Time: 15 minutes
- Cook Time: 40-45 minutes
- Total Time: 29 minute
Ingredients
– 1 box of chocolate cake mix
– 1 cup water
– 1/3 cup vegetable oil
– 3 large eggs
– 1 cup strawberries, hulled and diced
– 8 oz cream cheese, softened
– 1 cup powdered sugar
– 1 teaspoon vanilla extract
– 1/2 cup strawberry jam
– 1/2 cup mini chocolate chips (optional)
– Powdered sugar for dusting (optional)
Instructions
Follow these steps to create the amazing Gooey Strawberry Earthquake Cake:
1. Preheat the Oven: Start by preheating your oven to 350°F (175°C). Grease a 9×13-inch baking dish to prepare for the cake.
2. Mix the Cake Batter: In a large mixing bowl, combine the chocolate cake mix, water, vegetable oil, and eggs. Mix according to package directions until well-blended.
3. Pour the Batter: Pour the cake batter into the prepared baking dish, spreading it evenly.
4. Prepare the Cream Cheese Layer: In a separate bowl, beat together the softened cream cheese, powdered sugar, and vanilla extract until smooth.
5. Add the Strawberries: Stir in the diced strawberries and half of the mini chocolate chips (if using) into the cream cheese mixture.
6. Spoon Cream Cheese Mixture: Drop spoonfuls of the cream cheese mixture randomly over the surface of the cake batter. Do not spread; let it sit to create the “earthquake” effect while baking.
7. Add Strawberry Jam: Drizzle the strawberry jam over the top of the cake, distributing it as evenly as possible.
8. Bake the Cake: Place the baking dish in the preheated oven and bake for 40-45 minutes, or until a toothpick inserted into the center comes out clean.
9. Cool the Cake: Once baked, remove the cake from the oven and let it cool in the pan for about 20 minutes.
10. Dust with Powdered Sugar: If desired, dust the top of the cooled cake with powdered sugar for an elegant touch.
11. Add Remaining Chocolate Chips: Sprinkle the remaining mini chocolate chips on top for extra flavor and decoration.
Nutrition
- Serving Size: 12
- Calories: 350
- Fat: 15g
- Protein: 6g