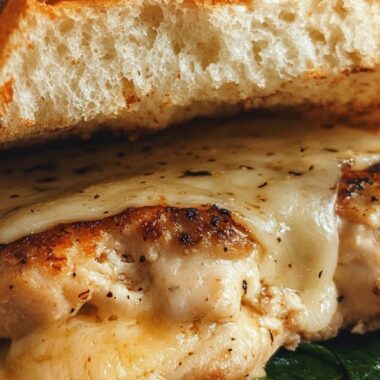
Cheesy Garlic Chicken Wraps are a delicious way to elevate your meal prep game. Their combination of flavors and textures creates an irresistible dish that’s perfect for lunch, dinner, or even a quick snack. Imagine biting into a warm, soft wrap filled with juicy, cheesy chicken kissed by garlic and fresh herbs. Each bite will transport you to flavor town, making it a delightful experience for your taste buds. Whether you’re planning a family dinner or a casual gathering with friends, this recipe is sure to impress.
If you love cheesy, savory goodness, you will be captivated by these Cheesy Garlic Chicken Wraps. This dish is not only delectable but also incredibly easy to prepare, making it suitable for cooks of all skill levels. In this article, we will explore what makes these wraps so special, how to prepare them, and tips for serving them perfectly. You’ll understand why this recipe has gained a stellar reputation among food lovers everywhere!
The blend of creamy cheese, tender chicken, and the aromatic punch of garlic creates a satisfying meal that is as wholesome as it is flavorful. Add the crunch of fresh vegetables, and you have a wrap that is hearty and nutritious. If you’re curious to see how you can make this amazing dish at home, let’s jump right into why you’ll love this recipe.
Why You’ll Love This Recipe
Cheesy Garlic Chicken Wraps have earned their place as a favorite in many households for a multitude of reasons. Here are just a few why you’ll adore making them:
1. Convenience: These wraps come together quickly, making them perfect for busy weeknights.
2. Versatile Filling: You can customize them to suit your taste—swap in turkey, roast beef, or even a vegetarian option.
3. Family-Friendly: Kids and adults alike will love the cheesy, savory flavor.
4. Healthy Options: Use whole-grain wraps and load them with fresh veggies to amp up the nutrition.
5. Easy Storage: These wraps hold up well in the fridge, making them a great meal prep option.
6. Delicious Leftovers: If there are any leftovers, they are just as mouthwatering the next day.
With such appealing attributes, it’s no wonder that Cheesy Garlic Chicken Wraps are quickly becoming a staple in homes everywhere! They showcase a mouthwatering amalgamation of tastes that will keep you coming back for more.
Preparation and Cooking Time
To whip up these delightful Cheesy Garlic Chicken Wraps, you’ll need a manageable amount of time. Here’s how it breaks down:
– Preparation Time: 20 minutes
– Cooking Time: 15-20 minutes
– Total Time: Approximately 35-40 minutes
This time will vary depending on your overall cooking experience, the equipment you’re using, and whether you’re making a double batch to share!
Ingredients
– 2 cups cooked chicken, shredded
– 1 cup shredded mozzarella cheese
– 1/2 cup cream cheese, softened
– 3 cloves garlic, minced
– 1 tablespoon olive oil
– 1 teaspoon Italian seasoning
– Salt and pepper, to taste
– 4 large flour tortillas or wraps
– 1 cup fresh spinach or mixed greens
– 1/2 cup diced tomatoes (optional)
– 1/4 cup sliced olives (optional)
Step-by-Step Instructions
Creating Cheesy Garlic Chicken Wraps is straightforward if you follow these steps sequentially:
1. Preheat the Grill or Skillet: Start by warming up a grill or a nonstick skillet over medium heat.
2. Prepare the Chicken Mixture: In a mixing bowl, combine the shredded chicken, mozzarella cheese, cream cheese, minced garlic, olive oil, Italian seasoning, salt, and pepper. Mix until well combined.
3. Layer Your Wraps: Lay a tortilla flat on a clean surface. Place a generous amount of the chicken mixture in the center.
4. Add Fresh Greens: Top the chicken mixture with a handful of fresh spinach or mixed greens. You can also add optional ingredients like diced tomatoes or sliced olives if desired.
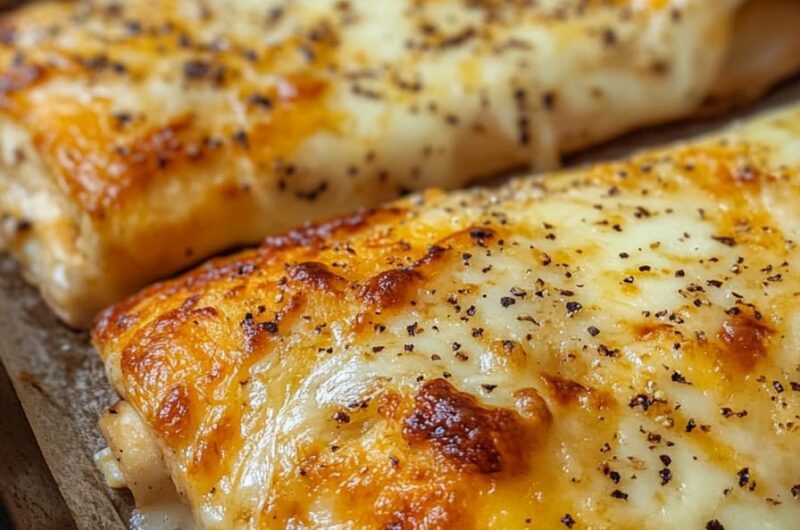
5. Wrap It Up: Fold in the sides of the tortilla and then roll from the bottom to the top to create a tight wrap.
6. Grill the Wraps: Carefully place the wraps seam-side down onto the heated grill or skillet. Grill for about 2-3 minutes on each side until golden brown and the cheese is melted.
7. Slice for Serving: Remove the wraps from the grill. Let them rest for a moment, then slice in half diagonally to reveal the cheesy filling inside.
8. Repeat: Repeat the process with the remaining tortillas and filling.
These simple steps will guide you through the process of making these flavorful wraps effortlessly. With such ease, you’ll want to make them regularly!
How to Serve
The way you serve these Cheesy Garlic Chicken Wraps can enhance the overall experience. Here’s how to do it right:
1. Presentation: Serve the sliced wraps on a large platter, allowing guests to choose their own portions.
2. Dipping Sauces: Offer a selection of dipping sauces such as ranch, salsa, or a garlic aioli to elevate the flavor profile.
3. Garnish: A sprinkle of fresh herbs or a drizzle of balsamic glaze can add a beautiful touch on top.
4. Accompaniments: Pair the wraps with a light salad or some fresh fruit for a balanced meal.
5. Meal Prep: If making for the week, wrap them individually in foil or parchment paper for easy grab-and-go meals.
By putting thought into your serving presentation, you can create a memorable and enjoyable meal for you and your family or friends. Cheesy Garlic Chicken Wraps are not just a dish but an experience you’ll want to savor!
Additional Tips
– Use Fresh Ingredients: Opt for fresh garlic and high-quality chicken for the best flavor. Fresh herbs can elevate the taste even further.
– Experiment with Cheeses: While mozzarella is fantastic, mixing in other cheeses like cheddar or pepper jack can add depth to the flavor.
– Allow the Mixture to Chill: If possible, let the chicken mixture sit for about 30 minutes after mixing. This allows the flavors to meld beautifully.
– Toast Tortillas: Lightly toasting the tortillas before filling can add an extra layer of flavor and help them hold their shape better.
Recipe Variation
Don’t hesitate to get creative with your Cheesy Garlic Chicken Wraps. Here are several delightful variations to try:
1. Buffalo Chicken Wrap: Replace the plain chicken with shredded buffalo chicken and add blue cheese crumbles for a spicy kick.
2. Mediterranean Wrap: Substitute the chicken with grilled chicken seasoned with lemon and herbs, then incorporate feta cheese, cucumbers, and tzatziki sauce.
3. Veggie Delight Wrap: Omit the chicken altogether and fill with assorted grilled vegetables, hummus, and shredded cheese for a vegetarian option.
Freezing and Storage
– Storage: Keep wraps in an airtight container in the fridge for up to 3 days. They maintain flavor and freshness well when stored properly.
– Freezing: You can freeze the uncooked wraps. Wrap them tightly in plastic wrap and aluminum foil, storing them for up to 2 months. Just thaw in the fridge overnight and cook as instructed when you’re ready.
Special Equipment
To prepare these Cheesy Garlic Chicken Wraps efficiently, you will need:
– Mixing bowl for combining ingredients
– Grill or nonstick skillet for cooking
– Measuring cups and spoons
– Sharp knife for slicing
– Cutting board for prep work
Frequently Asked Questions
Can I use rotisserie chicken?
Yes, rotisserie chicken is an excellent option. It saves time and adds flavor with its seasoning.
What can I use instead of flour tortillas?
You can try whole wheat, spinach, or corn tortillas for a healthier or gluten-free alternative.
Can I prepare these wraps in advance?
Absolutely! Make them a few hours ahead of time, just store them in the fridge until you are ready to grill.
Is it necessary to grill the wraps?
Grilling helps melt the cheese and create a crispy texture on the outside. However, you can also enjoy them cold or warmed in a microwave.
Conclusion
Cheesy Garlic Chicken Wraps are a delightful meal that combines simplicity with mouthwatering flavors. Perfect for lunch, dinner, or even a casual gathering, this recipe is adaptable for everyone. With a few tweaks and additions, it can easily fit various dietary preferences, making it a staple in any kitchen. Your family and friends will surely be asking for seconds!
Cheesy Garlic Chicken Wraps: An Amazing Ultimate Recipe

- Prep Time: 15 minutes
- Cook Time: 20 minutes
- Total Time: 35 minutes
Ingredients
– 2 cups cooked chicken, shredded
– 1 cup shredded mozzarella cheese
– 1/2 cup cream cheese, softened
– 3 cloves garlic, minced
– 1 tablespoon olive oil
– 1 teaspoon Italian seasoning
– Salt and pepper, to taste
– 4 large flour tortillas or wraps
– 1 cup fresh spinach or mixed greens
– 1/2 cup diced tomatoes (optional)
– 1/4 cup sliced olives (optional)
Instructions
Creating Cheesy Garlic Chicken Wraps is straightforward if you follow these steps sequentially:
1. Preheat the Grill or Skillet: Start by warming up a grill or a nonstick skillet over medium heat.
2. Prepare the Chicken Mixture: In a mixing bowl, combine the shredded chicken, mozzarella cheese, cream cheese, minced garlic, olive oil, Italian seasoning, salt, and pepper. Mix until well combined.
3. Layer Your Wraps: Lay a tortilla flat on a clean surface. Place a generous amount of the chicken mixture in the center.
4. Add Fresh Greens: Top the chicken mixture with a handful of fresh spinach or mixed greens. You can also add optional ingredients like diced tomatoes or sliced olives if desired.
5. Wrap It Up: Fold in the sides of the tortilla and then roll from the bottom to the top to create a tight wrap.
6. Grill the Wraps: Carefully place the wraps seam-side down onto the heated grill or skillet. Grill for about 2-3 minutes on each side until golden brown and the cheese is melted.
7. Slice for Serving: Remove the wraps from the grill. Let them rest for a moment, then slice in half diagonally to reveal the cheesy filling inside.
8. Repeat: Repeat the process with the remaining tortillas and filling.
These simple steps will guide you through the process of making these flavorful wraps effortlessly. With such ease, you’ll want to make them regularly!
Nutrition
- Serving Size: 4 wraps
- Calories: 450 kcal
- Fat: 20g
- Protein: 35g